Wednesday, July 30, 2025

CV Wood Caboose Paint Schemes

Caboose 4012 at Montville, Conn. 

(Photos from Bob's Photos, author's collection, unless otherwise noted). 

From the early 1920s through the 1970s Central Vermont rostered two distinct types of cabooses. I should add that at some points in time and in some areas the term "van" was used to describe a caboose. My understanding is that "van" was more common on the Northern Division of the railroad, which makes some sense since it obviously originated with the Canadian National.  

The first style of caboose consisted of three cars (4050-4052). These were also the first cabooses built for the CV by an outside builder. American Car & Foundry (AC&F) delivered these cars in 1923. They featured a steel underframe with wood bodies. These were very similar in basic dimensions to the "Northeastern" caboose used by a number of railroads such as the Lehigh Valley, LNE, Western Maryland and others. The primary difference was most of this style of caboose had steel bodies, but the CV cars were wood. 

CV 4007, East New London, Conn. (Bob's Photos).

The remaining CV wood cabooses were a total of 28 cars numbered between 4000-4030. The majority of these were rebuilt from previous cabooses or wood boxcars in the St. Albans shops, but they were remarkably similar in appearance and detail. Two exceptions were 4006 and 4021  - I suspect they replaced two previous cars with the same numbers or at the very least they were extensive enough rebuilds of those two cars that the CV Car Classification sheets noted they were "built" in 1951. 

This post is not meant to be a detailed history of CV cabooses - instead I thought I'd share some images that show some of the various paint schemes used on the wooden cars from the early 1920s through the 1970s. The photos will show one or two variations, but essentially there are three different schemes used on CV cabooses. 

Scheme 1: The first was all "brown" or freight car red, with "Central Vermont" spelled out in Roman lettering along the top of the side. 
AC&F Builder's Photo of CV 4050 shows off the early 1920s paint and lettering scheme. 


CV 4013, one of the home built "long" cabooses, shows off her original lettering scheme. 

Scheme 1a:
 The Central Vermont lettering got smaller and was on the lower portion of the carbody. See photo of 4013 below for an example of the size and placement of the Central Vermont lettering. 

Scheme 1b: Same paint scheme as Scheme 1a with "Rocket" slogan lettering. There were actually at least two different styles of Rocket lettering that I've seen photos of, one of which is shown on 4013 below. The other was a square box type logo that was centered on the car side. 

By 1939 the Central Vermont was still Railroad Roman but had gotten smaller and moved to the lower portion of the side. Some cabooses, like this one, got the flashy "Rocket" lettering. 

Scheme 2: Starting in the early 1940s paint scheme shifted from all brown to a combination of Red #11 underframe and trucks and orange body. This coincided with a shift to the "stacked Gothic" style lettering on its freight cars and cabooses. "Central" and "Vermont" were stacked above one another with the car number below.

CV 4006 shows off her then-new paint scheme of Red underframe and orange body. (Also note how dirty these cabooses got in service!) 

Scheme 2a: Shortly after the introduction of the Canadian National's "Super Continental" paint scheme the CV adopted a Maple Leaf logo. Close comparison will reveal the CV leaf had a slightly different shape than the "standard" CN leaf. The Maple Leaf was added to the cabooses with the words "Central Vermont Railway" spelled out in three lines inside the leaf. The car number also moved to a different position on the car side (usually to the left) with this lettering. 

Here's our old friend, 4013, in the post 1954 or so "Maple Leaf" scheme. By this point 4013 had received the open slat steps. A note for modelers - these are a neat detail to add to your CV caboose fleet! 

CV 4019 at Essex Junction shows how the cars weathered, but you can see tell the underframe and trucks were painted a different color than the car body. 

CV 4050, Scheme 2a (Maple Leaf) scheme. Note the placement of the car number. 


Scheme 3: Orange car bodies with black underframes and intertwined "CV". This would have first appeared in 1963 or so. The CV logo was in roughly the same position below the cupola, with the car numbers (and "CV" initials) along the lower edge of the car. The size of the car numbers on the car side also increased with this paint and lettering scheme over time. 

One note on the roof colors. Although CN vans painted in the orange scheme are documented to have had Red #11 underframes AND roofs, from photos it appears as if the CV cabooses had black roofs. While the walkways may have been orange at one point, there's plenty of photographic evidence that indicates the walks may also have been black. Perhaps it was a case of the walks being orange at first and then being repainted black with the rest of the roof. For modelers, a photo of the specific car you're modeling during your era is of course the best reference! 
 

Monday, July 28, 2025

CN F-M H16-44s on the Central Vermont

 In case you wanted to justify adding one (or more) of the new Rapido Canadian National F-Ms to your CV layout - here's an assortment of H16-44s of various types on the Central Vermont that I dug out of my slide collection. NOTE: Not all of these are the exact prototypes for the Rapido model, which is based on the phase of the H16-44 that was introduced in early 1957.

As always, thanks to the photographers (most of whom have left us) for having the foresight to point their lenses at these machines and for their willingness to share the images with the rest of us. 

If you want to learn more about H16-44s, and get a close up look at the Rapido model, I suggest checking out Hunter Hughson's Hindsight RPM clinic, which you can find on YouTube at: 

https://youtu.be/k-Wz4YXf8pc?si=9O3f2QgWTqFAk9Hy


CN H16-44 1856 and 1853. R Decker photo. St. Albans, Vt. 3-1957

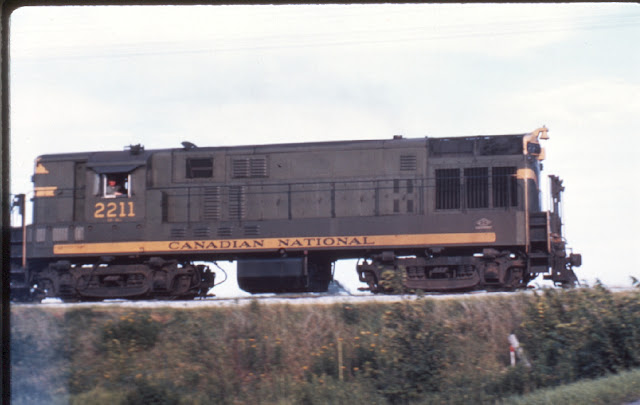
CN 2211 is the same group as the new Rapido model. R. Decker photo, 4-1957, location not noted.

An interesting trio of CN diesels on the Central Vermont. D. Nelson photo. St. Albans, Vt. area. Date unknown.

A pair of CN H16-44s, led by no. 1851, cross the Connecticut River near Brattleboro, Vt. Dave Sweetland photo, August 1955. 

In case you thought the H16-44s didn't make it to the Southern Division, here CN 1851 leads a train out of East New London, Conn. Bob Decker photo, 5/22/1955

Monday, July 14, 2025

New Video: Track and Wiring Tweaks, 2

 I just posted the second of three videos in my Track and Wiring Tweaks series to my CVSNE YouTube channel. 

In this video I take a closer look at a turnout in Richford yard - what looked "in the heat of battle" (ie., during the operating session!) to be a tight gauge in the turnout that was causing the S-4 switcher to get "pinched" and stuck on the turnout. 

Checking the turnout and the locomotive with a gauge confirmed the gauge was not the issue. That particular locomotive needs it's decoder tuned a bit the track issue was easily corrected. 

You can find the video at THIS LINK


Wednesday, July 9, 2025

New Video - Track and Wiring Tweaks: 1

 I've uploaded a new video to my "CVSNE" YouTube channel detailing the process I went through troubleshooting and ultimately replacing a cantankerous turnout in my town of Berkshire. 

This is hardly in danger of winning any Academy Awards, but you might find something useful. 

You can find the video HERE

This is the first video showing how I'm going about correcting the issues we identified on the layout during Operating Session #1. 


Wednesday, July 2, 2025

Op Session #1 and Video Layout Update #15

The Richford Turn leaves Enosburg enroute for Richford during Session #1. 

Last Sunday was hot and muggy (though downright pleasant compared to today!) - the perfect weather to retreat to the basement where it's always a pleasant sunny day in mid October in northern Vermont! 

The occasion was operating session 1.0 on the Richford Branch. 

I invited three good friends over to put the layout through its paces. I was concerned there wouldn't be enough to do to keep them entertained and occupied, but was pleasantly surprised to find that wasn't the case. In the end the layout supported an enjoyable, low key session for three operators and could have handled a fourth operator if only there had been another throttle available. 

Operating the layout solo over the last couple of years revealed that working the town of Richford itself can easily consume an hour or so - the paper mill another hour or so - meaning it might take the branchline local 4 hours+ to finish its run over the entire layout. 

Bernie ponders his next move with the mill job. 

My original intention for this session was to have two trains, each with a two-person crew - one working the paper mill job, the other running the branchline local around the rest of the layout. But that would still require the branchline local to work  Richford yard. 

So we tried something different and created a Richford yard job that spotted and sorted the cars for the local when it pulled into town. Not entirely prototypical for my era, (it was done that way in earlier eras) but it worked out really well. 

Todd brings the Richford Turn into Richford as Bill looks on. 

It worked out so well I think we'll stick with this lineup for the foreseeable future: 

1. Richford Turn (the branchline local)

2. The Mill Job - works the paper mill

3. Richford Yard Job 

4. The Charlton Turn - works the "northern SNE" section of the railroad. 

We also discussed the possibility of breaking the milk cars into a separate train. Depending on how many people we have I might try doing that next time. The Richford Turn has a lot of do as it is, and shifting the milk traffic to its own train may prove an ideal solution. 

There were no issues with anyone feeling cramped or crowded - a function of mostly 3+ foot aisles in many places. That also  means I can accommodate more operators by going to two-person crews in case, for example, a group of people come from out of town to operate. 

I was giving serious consideration to removing the paper mill peninsula and lengthening the Richford peninsula and adding a turnback curve that would loop around into more staging. Based on the feedback from the operating crew, the paper mill stays - for now. 

That covers number of trains and operators - but did the layout offer sufficient play value? I was somewhat concerned people would find it boring to operate, they would be done in 15 minutes and wondering what they were supposed to do the rest of the day. 

In the end I didn't need to worry - the layout kept us busy for the better part of 2.5 hours. And everyone finished about the same time. 

How did the layout perform? 

In short, there were a couple of little glitches, but nothing overwhelming. Likely since I’ve been running the layout on and off for a few years.

A few gremlins did raise their heads - nothing horrible but enough to need some attention. 

For example, I'm going to fix (ie, replace!) a turnout in Berkshire that just doesn’t want to cooperate. And Todd managed to find the one spur where the feeders were loose (or not there!) so I need to deal with that. And the track in Charlton needs a good cleaning. 

The only other “issues” were one or two cars with coupler issues. I put them aside and will deal with them before they go back on the railroad.

The only other thing I need to deal with is upgrading some of the operator aides - apparently my handwriting hasn’t improved since grade school!

All in all a great time was had by all - thanks to Stic for all his help getting us to this point (unfortunately he was out of town so he missed this one) and to Bernie, Bill, and Todd for bringing the Richford Branch to life! 

And I posted a new video update on the layout, that shows some of the progress on a couple of structures and provides a hot wash of the operating session #1. You can find that on You Tube at: 

https://youtu.be/gww1AGRdOJU?si=S7JHRQzSGxN2AJKp

Friday, May 23, 2025

Ice Cream Parlor for Enosburg - 2


Finished the ice cream parlor for Main Street in Enosburg. This is the one spot on the "outer loop" of the layout that has no scenery started at all. I've decided completing this area is the going to the primary goal for the next few months. (Secondary goals include conducting several test op sessions for someone other than myself!) 

The building is Evergreen styrene, built using my normal method of a plain styrene subshell covered with styrene clapboard and novelty siding to capture the look of the prototype building. The awnings were interesting - I made a styrene shell for them and then glued tissue paper in place to give some semblence of cloth texture. A base coat of blue paint, with some drybrushed highlights of lighter blue, hopefully gives the illusion of minor folds in the "fabric." 

The sign was prepared by Bernie Kempinski - and really helps make the building. He thought that he'd gotten away with doing signs with the passing of our mutual friend Paul Dolkos. No such luck. 


Thursday, May 15, 2025

Pallets and other details for Clear Brook

I worked from home yesterday meaning I had a few minutes in the early morning (on a typical day that would have been spent on the VRE) and at lunch to knock out a quick project. In the morning I pulled out a bunch of the kit castings (that I'd previously painted). I also dug out a package of pallets I'd gotten from Inter Action Hobbies: (https://www.interactionhobbies.com/HO-Scale-Kit-Wood-Pallets-18-Pallets_p_96.html).

About 15 minutes later the pallets were glued together. Lunchtime I returned and brushed some quick stains to get rid of the "new" look of the pallets. I also chipped and cracked some of them. Last night (before I started my nightly routine) I placed the details around Clear Brook. 

A nice break through the day!